No-Knead Honey Oat Bread
Total Time
14 hours, 30 minutes
Prep Time
13 hours, 20 minutes (includes rises)
Cook Time
55 minutes
Rating
4.8 out of 5 stars
(42)
Ingredients
1 loaf
- 3 cups + 2 Tablespoons (410g) bread flour (spooned & leveled), divided
- 1 cup (85g) old-fashioned whole oats or quick oats (not instant)
- 1 and 1/2 teaspoons (4g) Platinum Yeast from Red Star or any instant or active dry yeast
- 1 and 1/2 teaspoons salt
- 1/2 teaspoon ground cinnamon
- 1 and 1/2 cups (360ml) water, close to room temperature at about 70°F (21°C)
- 6 Tablespoons (128g) honey
- 2 Tablespoons (30ml) vegetable oil (or other neutral tasting oil)
How would you rate this recipe?
Preparation
Step 1
In a large ungreased bowl, whisk 3 cups (390g) bread flour, the oats, yeast, salt, and cinnamon together. Set aside. In a medium bowl or large liquid measuring cup, whisk the water, honey, and oil together. Pour water mixture into flour mixture and gently stir together with a silicone spatula or wooden spoon to combine. Dough will be heavy and very wet/sticky. Do not overwork dough. (Tip: Stir dough by hand. Dough is too sticky for a mixer.)
Step 2
1st rise: Cover the dough tightly with plastic wrap or aluminum foil and set on the counter at room temperature—honestly any normal room temperature is fine. Allow to rise for 12-18 hours. (See note if you need to extend this time.) Depending on the size of your mixing bowl, the dough will mostly rise out to the sides of the bowl instead of rising up. Some upward rise is normal if your bowl is on the smaller side. The dough will stick to the sides of the bowl and have a lot of air bubbles. You want it to almost double in size during this time.
Step 3
Grease a 9×5-inch loaf pan.
Step 4
Gently shape: After rising, uncover dough and gently fold in remaining 2 Tablespoons (about 20g) of bread flour. Dough is very sticky, but the extra flour makes it more manageable. Pour dough (and any excess flour that is not mixing in) onto work surface. Using lightly floured hands, gently form into a loaf shape, about 8×4 inches. Does not have to be perfect, so don’t over-think the shape or overwork the dough. Place in greased pan and using a very sharp knife or bread lame (some even use kitchen shears), score the bread loaf with 1 slash down the center or off-center, about 1/2 inch deep. (“Score” = shallow cut.)
Step 5
2nd rise: Loosely cover loaf with plastic wrap or aluminum foil and set on the counter at room temperature for 1 hour or until dough rises slightly above the rim of the pan.
Step 6
Meanwhile, towards the end of the 2nd rise, preheat oven to 375°F (191°C).
Step 7
After rising, remove plastic wrap/covering from bread and bake for 50-60 minutes. The loaf will begin to heavily brown on top, so tent it with aluminum foil after 30 minutes. How to test for doneness—give the loaf a light tap. If it sounds hollow, it’s done. For a more accurate test, the bread is done when an instant read thermometer reads the center of the loaf as 195°F (90°C). (Tip: Keep in mind that the bread will continue to cook for a few minutes as it cools.)
Step 8
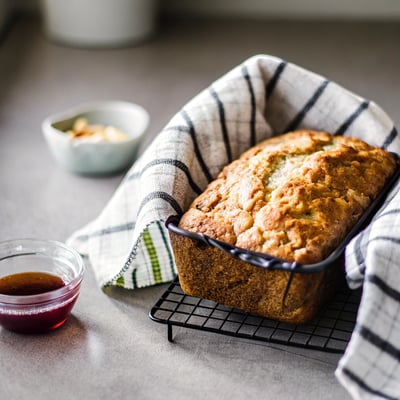
Remove from the oven and allow bread to cool for at least 15 minutes in the pan set on a wire rack before slicing and serving. Feel free to let it cool completely before slicing, too.
Step 9
Cover leftover bread and store at room temperature for up to 3 days or in the refrigerator for up to 10 days.
Step 10
Save recipe for the next time?
Chef's notes
Make Ahead Instructions:
This recipe is wonderful for making ahead because the 1st rise time (step 2) is so long. If needed, you can extend the 1st rise time by letting the dough rest in the refrigerator instead of at room temperature for up to 18 hours. Then, after refrigerating, let the dough sit at room temperature to warm and rise, about 4-6 hours. You want it to mostly double in size during this time. Do not extend these times further because the dough may begin to deflate.
Freezing Instructions:
Prepare recipe through step 4 and feel free to use a disposable loaf pan since it will be going into the freezer. Cover loaf tightly and freeze for up to 3 months. On the day you serve it, let the loaf thaw and rise for about 5 hours at room temperature. Bake as directed. You can also freeze the baked bread loaf. Allow the bread to cool completely and then freeze for up to 3 months. Thaw in the refrigerator or at room temperature and reheat if/as desired.
Recipe updated in 2022 with clearer instructions and less honey, cinnamon, and slightly more yeast. Older version of this recipe used 1/2 cup (170g) honey but over the years, I’ve reduced it down to 6 Tablespoons (128g) so the loaf isn’t as sweet and sticky. The recipe also had 1 and 1/4 teaspoons of yeast, but I slightly increased it for better rise and it also used to have 1 teaspoon of cinnamon in the dough. I find that much takes away from the honey and oat flavors so I cut the cinnamon amount in half.
Can I make this in a dutch oven? Yes and the process is similar to Cranberry Nut No-Knead Bread. You need a 6-quart or larger dutch oven or any large oven-safe pot with a lid. Prepare dough recipe above through step 2. Turn the dough out onto a lightly floured work surface and, using lightly floured hands, shape into a ball as best you can. Doesn’t have to be perfect! Transfer dough to a large piece of parchment paper. (Large enough to fit inside your pot and one that is safe under such high heat. I use this parchment and it’s never been an issue.) Lift the parchment paper and dough up and place it all into a large mixing bowl. Using a very sharp knife or bread lame, gently score an X into the top. Cover dough lightly with plastic wrap and leave alone for 30 minutes. During this 30 minutes, preheat the oven to 425°F (218°C). Place your dutch oven (with the lid) or heavy duty pot inside for 30 minutes so that it’s extremely hot before the dough is placed inside. After 30 minutes, remove the dutch oven from the oven and carefully place the dough inside by lifting it up with the parchment paper and sticking it all–the parchment paper included–inside the pot. Cover with the lid. Bake for 30 minutes with the lid on. Carefully remove the lid and continue baking for 10-12 more minutes or until the bread is golden brown. You can test for doneness exactly how you would in step 7 above. Remove pot from the oven, carefully remove the bread from the pot, and allow to cool on the counter for 30 minutes before breaking/slicing/serving.
Can I bake this free-form outside of the loaf pan or dutch oven? No, this bread needs a pan to help it hold shape.